New role, new laptop, new Operating system — Having come from Windows & Linux desktops, I found MacOS to be extremely jarring when it came to a number of simple but crucial tasks, it was time-consuming to find the equivalents and workarounds for many typicalß developer tools.
I’ll summarise my approach here and update as and when I find improvements.
A quick summary on what I need; Git, Code editors, Linux CLI, Linux containers, productivity shortcuts.
⚠️ Tested on MacOS 13.5 “Ventura”
Keyboard Layout
Setting the keyboard up is a good start, by default you will have a MacOS layout, but I recommend trying the “PC” variant.
System Settings → Keyboard → Input Sources
Add the “PC” variant for your language, in my case: British → British - PC
This moves the #, ~ & | keys to sensible places that don’t require odd key-combos to reach.
Homebrew
Homebrew is a free and open-source software package management system
Go to brew.sh and run the install command.
Homebrew packages
There are two types of Homebrew packages; Kegs & Casks.
Kegs are custom software packages bundled up for MacOS, they install in the Cellar ( /opt/homebrew ).
Casks are native MacOS apps that can be installed by Homebrew, they end up in the Applications folder.
Install Linux-like utils
MacOS bundles a lot of BSD CLI tools, but for a Linux developer this can get pretty frustrating since while the commands look the same, their features and flags vary.
We cannot replace these utils as MacOS requires them, so we install the GNU version alongside with the prefix g, this turns sed → gsed, tar → gtar, grep → ggrep, etc..
brew install bash bash-completion tmux qemustall coreutils findutils gnu-tar gnu-sed gawk gnutls gnu-indent gnu-getopt grep watch
To use the brew version of Bash, set your shell to /opt/homebrew/bin/bash in your terminal app.
In iTerm2, this is set under:
Preferences → Profiles → Default → General Tab → Command → Custom Shell = /opt/homebrew/bin/bash
More utils
brew install fswatch git go hugo jq tmux tree vim zsh
- fswatch - utility to watch for file modifications, similar to inotifywatch
Clipboard History
brew install clipy
Remember to open the app Preferences and Exclude sensitive apps like password managers.
I recommend disabling “Input ⌘ + V after menu item selection” and increasing “Number of items to place inline” so you see the most recent items without opening a folder.
Alt-RightClick resize window
https://github.com/dmarcotte/easy-move-resize
Allows moving and resizing windows with Modifier+RightClick dragging, instead of only by dragging the window decoration.
brew install --cask easy-move-plus-resize
iTerm2
iTerm2 brings the terminal into the modern age with features you never knew you always wanted.
iTerm2 is preferred over the MacOS Terminal.app because it provides more customisations and integrations with tools like tmux.
brew install iterm2
Alt-Backspace to delete last word
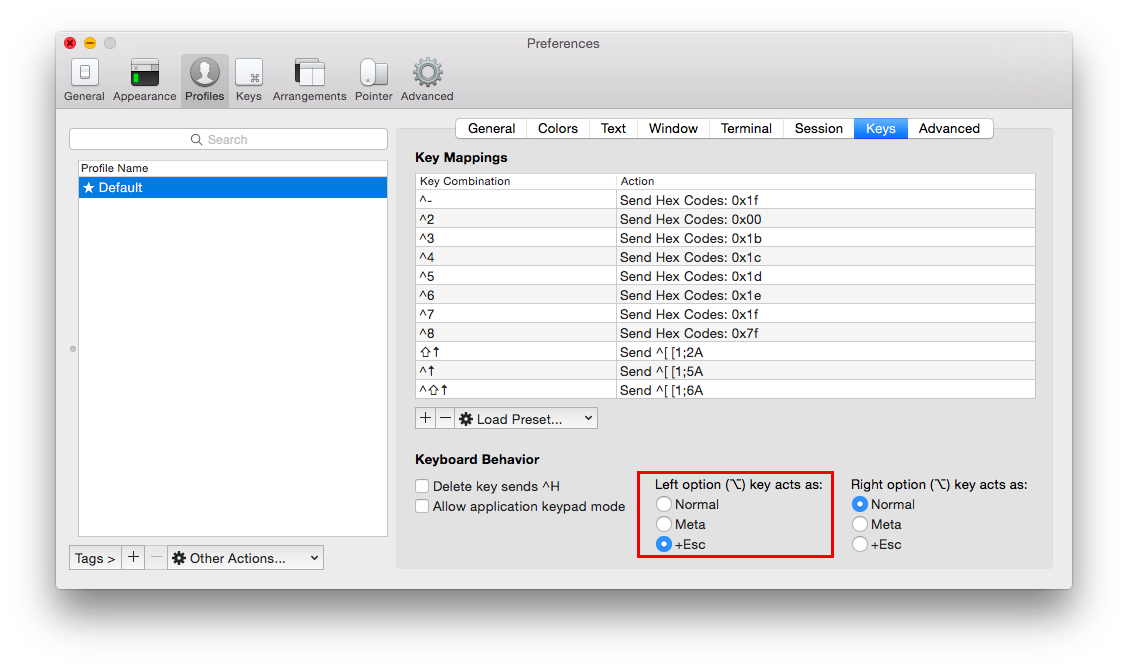
Thanks to https://github.com/fish-shell/fish-shell/issues/2124
Trackpad settings
Disable Dictionary popup when highlighting
Ever trying to highlight some text and accidentally click that dictionary popup? Yep, me too.
Settings → Trackpad → Point & Click → Look up & data detectors: Disable
Scrolling speed with non-Mac mouse
Apple seems to be making it painful for people to use non-Apple hardware, such as my USB Mouse.
Fix scrolling with Accessibility settings
The idea with this fix is to reduce the “Springiness” from scrolling, which looks nice but with a normal mouse results in scrolling significantly more to get the page moving.
Go to System Settings > Accessibility > Pointer Control:
Disable Spring-loading delay
Click Mouse Options... and set Scrolling Speed to Fast
Fix scrolling with MOS
This app further improves the scrolling experience with a normal mouse.
brew install mos
Set Step to 100
Set Speed to 3
Set Duration to 3
Control volume of HDMI devices
https://github.com/MonitorControl/MonitorControl
This app allows control of HDMI audio devices; such as integrated monitor speakers.
I found the system volume slider does not affect these types of devices on MacOS, this might not be the case with all devices.
brew install MonitorControl
Home and End keys behave like Windows on Text
By default the Home/End keys scroll to the top and bottom of the page, even when text is selected.
The expected behaviour is for Home/End to move the cursor to the Start/End of the line, the following Key Mappings should help.
Set ~/Library/KeyBindings/DefaultKeyBinding.dict to:
{
  /* Remap Home / End keys to be correct */
  "\UF729" = "moveToBeginningOfLine:"; /* Home */
  "\UF72B" = "moveToEndOfLine:"; /* End */
  "$\UF729" = "moveToBeginningOfLineAndModifySelection:"; /* Shift + Home */
  "$\UF72B" = "moveToEndOfLineAndModifySelection:"; /* Shift + End */
  "^\UF729" = "moveToBeginningOfDocument:"; /* Ctrl + Home */
  "^\UF72B" = "moveToEndOfDocument:"; /* Ctrl + End */
  "$^\UF729" = "moveToBeginningOfDocumentAndModifySelection:"; /* Shift + Ctrl + Home */
  "$^\UF72B" = "moveToEndOfDocumentAndModifySelection:"; /* Shift + Ctrl + End */
}
Containers
MacOS natively supports QEMU and containerd containers.
Docker
Docker Desktop works on MacOS.
Podman
Podman is a container runtime which is CLI-compatible with Docker.
Podman requires a Linux kernel to run containers, so on MacOS we run an extra step to provision a persistent VM from which the containers run:
podman machine init  # first time only
podman machine start
podman run -it docker.io/hello-world
The machine needs to be manually started whenever you reboot MacOS. There are more flags available to define the size and characteristics of the VM.
nerdctl + Lima
https://github.com/lima-vm/lima
Lima is a MacOS-native approach to containers, Lima servers a similar role as WSL for Windows.
nerctl is the docker-compatible CLI for Lima’s containers.
brew install lima
limactl start
lima nerdctl run -d --name nginx -p 127.0.0.1:8080:80 nginx:alpine
The machine needs to be manually started whenever you reboot MacOS.
QEMU via libvirt + virt-manager
QEMU is the only native platform for running Virtual Machines, you can manage and interact with these via virt-manager.
brew install virt-manager
brew services start libvirt
virt-manager  # Launches GUI
I hope this saves you some of the headaches this laptop has caused me!